
USB HID Reverse Engineering for beginners
THIS GUIDE IS WORK IN PROGRESS! SUGGESTIONS AND CONTRIBUTIONS ARE WELCOME!
Last updated: 2026-09-17
Change log
2026-09-17
- Added MacOS instructions
- Added new PyUSB example scripts
- Added more details about finding out the correct interface number
- Fixed some typos and grammar issues
Introduction
This is a beginner-friendly guide to reverse engineering proprietary USB HID protocols for devices such as RGB accessories (gaming peripherals, lights), toys, sound cards and other devices with proprietary control software (sometimes called “a driver”).
Not interested in understanding the protocol? Just gathering captures for someone else to analyze and reverse engineer?
Skip to the “Capturing USB packet data” section to just capture USB packets. Remember to name the pcapng files clearly and descriptively.
DISCLAIMER!
This guide skips over and simplifies many details. I’m not an expert in USB or USB HID, so there are almost certainly some errors or misconceptions in here. I’m not responsible if you damage or brick any devices while using this guide!
USB basics
What is USB HID?
USB HID stands for Universal Serial Bus Human Interface Device. It’s a USB standard meant for communicating with devices such as keyboards, mice, controllers and similar devices involving human interaction.
You can read more about USB HID in detail from the following sources if you feel adventurous:
- Wikipedia: https://en.wikipedia.org/wiki/USB_human_interface_device_class
- USB-IF’s USB HID specs: https://www.usb.org/hid
- USB Device Class Definition for Human Interface Devices (HID) v1.11: https://www.usb.org/sites/default/files/documents/hid1_11.pdf
- HID Usage Tables FOR Universal Serial Bus (USB) v1.5: https://www.usb.org/sites/default/files/hut1_5.pdf
How do USB Human Interface Devices communicate?
There are several types of communication between a computer and a USB HID device.
Report Descriptors
This is the device’s way of telling the host what it is and how it communicates, in very basic terms.
The reports describe which interfaces and endpoints the device has.
The reports don’t contain vendor-specific proprietary protocols, which are usually not publicly documented unless they have been reverse engineered.
Interfaces and endpoints
USB devices usually have at least one interface and one endpoint. Interfaces are used to separate different functionalities of a USB device. E.g. Interface 0 could be for device configuration and information, Interface 1 could be for Mouse data and Interface 3 could be for Keyboard data.
Endpoints define the communication type such as transfer type and direction. Endpoint 0 is usually used for Control transfers (as mandated by the USB spec).
USB Request Blocks (URBs)
URBs are a way for operating systems to structure USB packet data. URBs contain information about the direction and type of various transfers and the data (e.g. “wValue”, “leftover capture data” or “HID data”, depending on the transfer type and direction).
Here are a few examples of transfer types with simple explanations:
- USB Request Blocks (URBs):
- Interrupt transfers (URB_INTERRUPT): A common way to send and receive small amounts of data with minimal latency. Usually interrupt transfers are used for button presses, status updates and sometimes even device settings (like RGB LED values).
- Control transfers (URB_CONTROL): A common way to send and receive device settings and features with more complex structure. These transfers are non-time-critical and usually (imperceptibly) slower than interrupt transfers.
- Isochronous transfers (URB_ISOCHRONOUS): A way to send and receive a time-dependent, steady stream of data such as video or audio. These kinds of transfers are rarely used to send or receive device settings.
- Bulk transfers (URB_BULK): A way to send and receive non-time-critical bursts of data such as images or files. These kinds of transfers are probably never used to send or receive device settings.
Capturing USB packet data
There are various tools that can be used for capturing or “sniffing” USB packet data. I recommend using Wireshark with USBPcap/usbmon/libpcap since this guide contains step-by-step instructions based on those.
Required and recommended software
You will need some software to capture and analyze the USB packet data. Here are my recommendations which will be shown in more detail in this guide.
USB packet monitoring/sniffing
- Windows: USBPcap (Included in the Wireshark installer!)
- Linux: usbmon (built-in to most Linux distributions)
- MacOS: libpcap (built-in to MacOS)
Packet capture and analyzer
- Wireshark: Recommended! Compatible with Windows, Linux and MacOS.
Spreadsheet application (optional)
- LibreOffice Calc: A free and open-source spreadsheet application.
- Google Sheets: A free online spreadsheet application.
- Microsoft Excel: The industry standard spreadsheet application.
Hypervisor software
You may need a Windows virtual machine if the manufacturer’s official software is not available for Linux or MacOS. This is usually the case so I’ve gathered some resources below.
You’ll need a copy of Windows 10 or 11 which you can download here for free:
- Windows 10 ISO: https://www.microsoft.com/en-us/software-download/windows10ISO
- Windows 11 ISO: https://www.microsoft.com/en-us/software-download/windows11/
Here are some hypervisor software options for running a Windows VM on Linux or MacOS:
- Linux:
- Recommended: libvirtd + qemu + virt-manager
- Oracle VirtualBox + VirtualBox Extension Pack
- VMware Workstation Pro
- MacOS
- Recommended: UTM Virtual Machines
- VMware Fusion Pro
- Parallels Desktop
NOTE: Use your favorite web browser and search engine to look up instructions on how to install a Windows VM with your selected hypervisor software.
USB packet capture preparations
Windows host with Wireshark and USBPcap (no virtual machine)
Follow these steps if you are using Wireshark, USBPcap and Windows without a virtual machine.
Open a PowerShell window and run the following command to get the VID and PID values. Look for your device’s name. Let’s use “HyperX Pulsefire Dart” as an example. We can see the Vendor ID TIP: If the output only shows “USB Input Device” and “HID-compliant … device” lines then try to search the VID and PID values online to find out if that’s your device. You can use something like “USB 0951:16E1” as the search query. Open Wireshark, double-click the cogwheel next to USBPcap1, uncheck “Capture from all devices connected” and check and click Start. A new view will open which shows live capture data from USBPcap1. This will view the packet data of all newly connected USB devices. Disconnect and reconnect the USB device you wish to capture. You should see new packets appear soon after reconnecting the device. You may want to apply a filter like After confirming that the capture works, stop the current capture by clicking Stop in Wireshark. Discard any unsaved captures if prompted. You can now proceed to the next section about capturing and saving USB packets for inspection.See step-by-step instructions
Check the USB Vendor ID and Product ID of your device
PS C:\Users\User> Get-PnpDevice -Class HIDClass -PresentOnly | Select-Object FriendlyName, InstanceID

FriendlyName                          InstanceId
------------                          ----------
HyperX Pulsefire Dart                 HID\VID_0951&PID_16E1&MI_02\8&5C80A98&0&0000
HyperX Pulsefire Dart                 HID\VID_0951&PID_16E1&MI_01&COL02\8&34377B15&0&0001
HyperX Pulsefire Dart                 USB\VID_0951&PID_16E1&MI_02\7&8A381C0&0&0002
HyperX Pulsefire Dart                 USB\VID_0951&PID_16E1&MI_01\7&8A381C0&0&0001
HyperX Pulsefire Dart                 USB\VID_0951&PID_16E1&MI_00\7&8A381C0&0&0000
HyperX Pulsefire Dart USB\VID_0951&PID_16E1&MI_00\7&8A381C0&0&0000
0951 and Device ID 16E1 from one of the matching lines.Starting packet capture with Wireshark
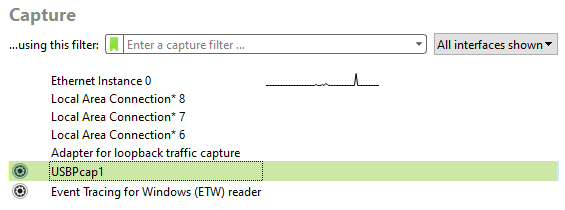
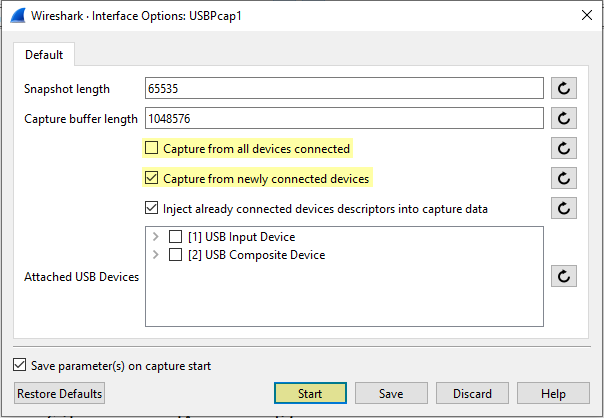
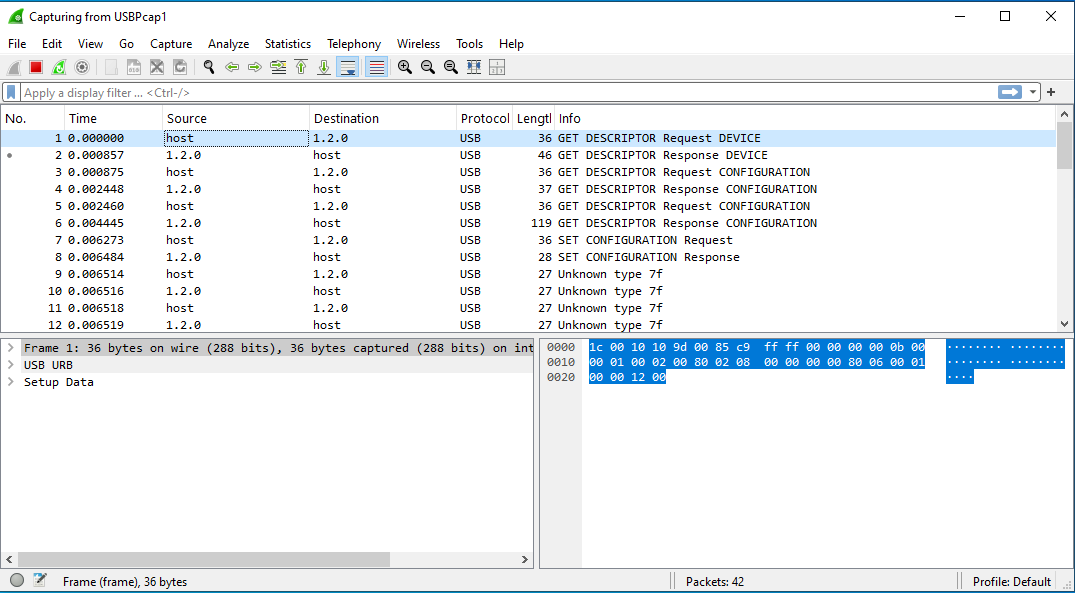
usb.device_address == Y (where Y is the second number in the source/destination column “X.Y.Z”) to capture only packets related to a specific device. This is especially useful if you need to connect a new USB device after starting the capture but don’t want to capture packets related to that device.
Linux host with Wireshark, usbmon and virt-manager
Follow these steps if you are using Wireshark, usbmon and virt-manager with a Windows virtual machine.
Open a terminal window and run Look for your device’s name. Let’s use “HyperX Pulsefire Dart” as as example. We can see that the device’s Vendor ID is Most Linux distributions ship with the usbmon kernel mode preinstalled. Allow “others” to read the usbmonX device. Replace X with the Bus number you got previously from lsusb. NOTE: You must do this every time you reboot your Linux machine and wish to capture USB packets. SECURITY WARNING! This command will expose the whole Bus to ALL USERS AND PROCESSES on the machine until you reboot. This could have serious security implications. Open Wireshark and choose the same usbmon device by double-clicking. A new view will open which shows live capture data from usbmonX. This will show the packet data of all devices connected to the same bus. You can filter the capture to only show packets related to the device of your choice by applying a filter like Next test redirecting the USB device to the Windows virtual machine while the Wireshark capture is running. Open Virt-Manager and start up the Windows virtual machine and redirect the USB to the virtual machine like shown. WARNING! Make sure you have another mouse/keyboard connected if you’re redirecting a mouse/keyboard device as you won’t be able to control the host OS and Wireshark using it. You should see the device appear in Windows after selecting it from the list and clicking Close. You should see new packets in the packets list after connecting the USB device to the virtual machine. There should also be some “GET DESCRIPTOR” packets from the moment when the USB device was transferred from Linux to Windows. You may have to scroll up to find the “GET DESCRIPTOR” packets if the list is constantly being filled with new packets from/to the device. After confirming that the capture still works while connected to Windows, stop the current capture by clicking Stop in Wireshark. Discard any unsaved captures if prompted. You can now proceed to the next section about capturing and saving USB packets for inspection.See step-by-step instructions
Check the USB Vendor ID and Product ID of your device
lsusb like shown:$ lsusb | grep -vi 'hub'
Bus 00X Device 00X: ID xxxx:xxxx Manufacturer name Device name
...
Bus 005 Device 008: ID 0951:16e1 Kingston Technology HyperX Pulsefire Dart
0951 and Product ID is 16e1 and that it is connected to the Bus 5 and Device Address 8.
NOTE: We will need these numbers later when filtering the USB packet capture with Wireshark and usbmon!Load usbmon
You can manually load the module with the modprobe command like shown.$ sudo modprobe usbmon
[sudo] password for user:
$ ls /dev/usbmon*
/dev/usbmon0 /dev/usbmon1 /dev/usbmon2 /dev/usbmon3 /dev/usbmon4 /dev/usbmon5 /dev/usbmon6
Temporarily allowing non-root access to usbmon device
$ sudo chmod o+r /dev/usbmonX
Starting packet capture with Wireshark
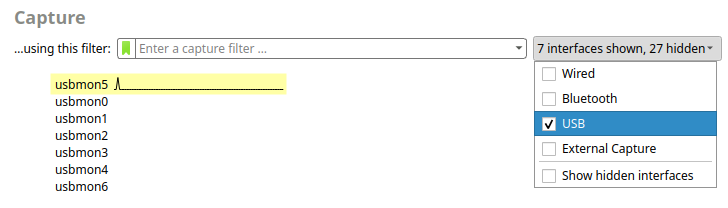
usb.device_address == X, where X is the device number from lsusb.
Redirecting the USB device to the virtual machine
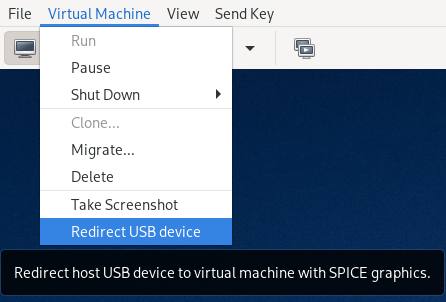
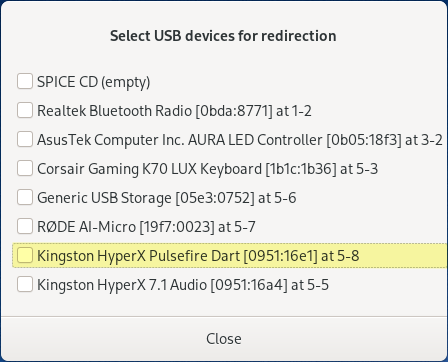
Check Wireshark to ensure the packet capture is still working
MacOS host with Wireshark and UTM
Follow these steps if you are using Wireshark and UTM with a Windows virtual machine.
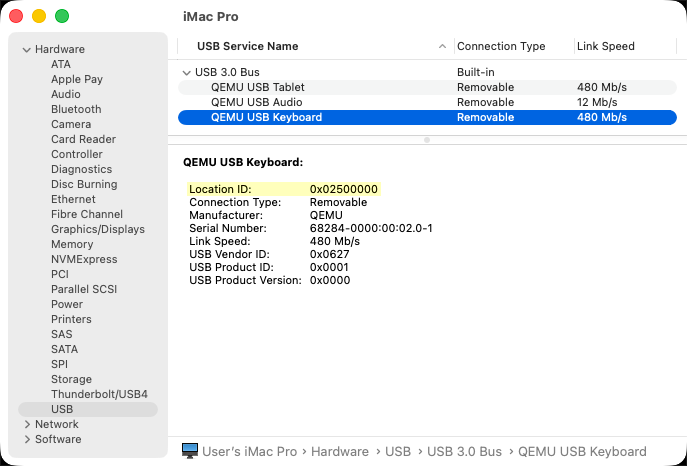
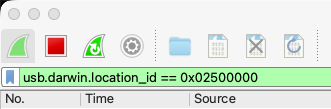
You must disable System Integrity Protection (SIP) to enable USB interface capture on MacOS. SECURITY WARNING! Disabling SIP has serious security implications. You should only disable SIP temporarily and re-enable it after you’re done capturing USB packets. See Apple’s official documentation: https://developer.apple.com/documentation/security/disabling-and-enabling-system-integrity-protection#Disable-System-Integrity-Protection-Temporarily Open the Terminal and run NOTE: You must do this every time you reboot your MacOS machine and wish to capture USB packets. Open the Terminal and run If neither interface is available, ensure SIP is disabled. Run Follow the Wireshark documentation on how to install Wireshark and ChmodBPF: https://www.wireshark.org/docs/wsug_html_chunked/ChBuildInstallOSXInstall.html Reattach the USB device while the Windows VM is running or alternatively access the USB button on the UTM toolbar to choose which USB device to redirect to the Windows VM. Open Wireshark and choose the XHC* interface by double-clicking. A new view will open which shows live capture data from XHC*. This will view the packet data of all USB devices (including the ones not redirected to the Windows VM). Find out the location ID for your device. It can be found by viewing the USB devices with the “System Information” tool (Applications -> Utilities -> System Information -> USB) or by using the You can filter the capture to only show packets related to the device of your choice by applying a filter like You can now proceed to the next section about capturing and saving USB packets for inspection.See step-by-step instructions
Limitations of MacOS
This means that some USB devices may not work properly or at all when redirected to a virtual machine. If the device does not work properly, you may have to use a Windows or Linux computer instead.Disable System Integrity Protection (SIP)
csrutil status to ensure that SIP is disabled. If it is enabled, reboot into recovery mode and disable it.Temporarily enable the USB packet capturing interface
sudo ifconfig XHC20 up or sudo ifconfig XHC2 up.ifconfig in the Terminal to see if any XHC* interfaces are available.Install Wireshark and ChmodBPF
Install UTM and create a Windows VM with USB sharing enabled
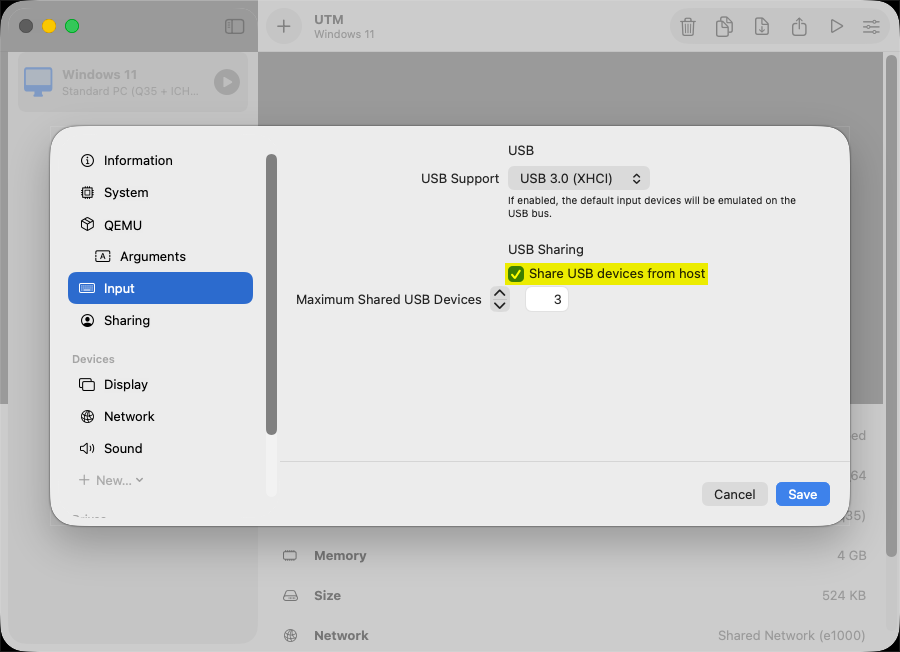
Starting packet capture with Wireshark
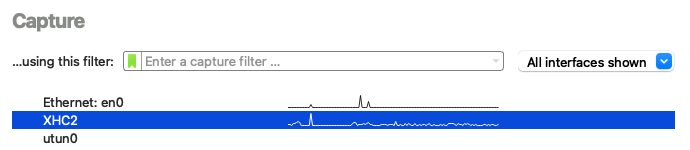
ioreg -p IOUSB -l -w 0 command in the Terminal.
usb.darwin.location_id == 0xNNNNNNNN where the 0xNNNNNNNN is the location ID of the device.
Other hypervisors and packet capture software
You’re on your own. Read the manuals and use your favorite search engine to look up instructions on how to do “USB device passthrough” or “USB redirection”.
Capturing and saving USB packets for inspection
This is the second most time-consuming step of reverse engineering a USB HID device’s protocol. There are multiple ways to gather packets for inspection and comparison, but the easiest approach is simply to change one setting per capture.
This is what I usually do when working with a new device:
- Close any manufacturer’s official software, if opened.
- Start Wireshark USB capture.
- Open the manufacturer’s official software
NOTE: Some software requires you to click the device from a list before it starts being controlled, thus producing packets. - Wait 10 seconds to ensure the manufacturer’s official software has sent and received all initialization packets.
- Change a single setting like RGB LED color, on/off toggles or sliders.
NOTE: Prefer using nice and easily recognizable values like “0” and “100”. For RGB colors, use “#AABBCC”. If manual values are not possible, start with the brightest red ("#FF0000") and brightest blue ("#0000FF"). - Close the manufacturer’s official software
NOTE: Sometimes you have to close the software from the taskbar or task manager to completely close it. - Stop the Wireshark capture.
- Save the shown packets to a file: File -> Export specified packets
NOTE: Make sure the “Packet Range” settings are at “Displayed” and “All packets” so you do not save packets from any other device.
Also use a clear name so you can remember and understand which capture contains what when you later inspect them.
E.g. “mouse_all_leds_static_100_bright_red.pcapng” - Go to step 1 and change the same setting as in the previous capture, but use a different value.
- Optional: You can also do multiple changes during a single capture if you keep track of the timing and the values.
E.g. set value to 1, wait 10 seconds, then set value to 2. The same 10-second delay should be visible in the capture, making it easier to differentiate between actions.
Experiment with multiple setting and value combinations. The more combinations you do, the more easily you can understand which packet and byte does what.
Sometimes it’s also a good idea to do two different captures with the exact same actions so you can double-check that a specific packet is what you’re really after.
Move to the next section when you think you’ve gathered enough captures. 2-3 captures should be enough to start reverse engineering the vendor protocol.
Inspecting the USB capture data
For this part you’ll have to understand how bytes work and how USB device vendor protocols usually work.
A single byte holds 8 bits which can be used to represent a number between 0 and 255.
This means that in some cases a single byte in the data could mean up to 255 different things (like RGB values for each primary color).
E.g. The RGB color magenta (#FF00FF) is a combination of red (#FF0000) and blue (#0000FF) which is (255, 0, 255) in decimal or 11111111 00000000 11111111 in binary (bits).
The Wireshark capture represents each byte as a hexadecimal value (hexadecimal 00-FF is the same as decimal 0-255). You might also see hexadecimal values with a 0x prefix like 0xFF outside of Wireshark.
Pick two packet capture (pcapng) files to compare. Start with packet captures that involve changing the same setting with two or more values.
E.g. RGB LED colors, a slider from 0 to 100 or an on/off toggle.
Open one PCAPNG file at a time into Wireshark and begin by filtering out all packets received from the device. We initially only want to know how to talk to the device.
Read this page to understand how Wireshark display filters work: https://www.wireshark.org/docs/wsug_html_chunked/ChWorkBuildDisplayFilterSection.html
You can apply the filter (usb.src == host) to only show packets sent to the device or (usb.dst == host) to only show packets received from the device.
Next you should look for URB_CONTROL and URB_INTERRUPT packets. These are usually used for setting changes when sent to or received from the device.
You can apply a filter for the usb.transfer_type field to only show specific transfer types.
(usb.transfer_type == 0)= Only show URB_ISOCHRONOUS packets (Isochronous transfers, you can probably ignore these)(usb.transfer_type == 1)= Only show URB_INTERRUPT packets (Interrupt transfers)(usb.transfer_type == 2)= Only show URB_CONTROL packets (Control transfers)(usb.transfer_type == 4)= Only show URB_BULK packets (Bulk transfers, you can probably ignore these)
Example filters:
- Only show packets sent to the device:
(usb.src == host) - Only show packets received from the device:
(usb.dst == host) - Only show interrupt transfers sent to the device:
(usb.src == host) && (usb.transfer_type == 1) - Only show control transfers sent to the device:
(usb.src == host) && (usb.transfer_type == 2) - Only show interrupt transfers received from the device:
(usb.dst == host) && (usb.transfer_type == 1) - Only show control transfers received from the device:
(usb.dst == host) && (usb.transfer_type == 2)
Inspecting URB_CONTROL and URB_INTERRUPT packets
URB_CONTROL and URB_INTERRUPT packets usually contain one of the following pieces of data:
- Leftover capture data (
usb.capdata) - HID data (
usbhid.data) - Data fragment (
usb.data_fragment)
Use the filter (usb.capdata || usbhid.data || usb.data_fragment) to only show packets which probably contain settings data.
You can also filter by contents if you think the data you’re looking for is in a predictable format (e.g. RGB color AABBCC).
Example filter for RGB value AABBCC: (usb.capdata contains aa:bb:cc) || (usbhid.data contains aa:bb:cc) || (usb.data_fragment contains aa:bb:cc)
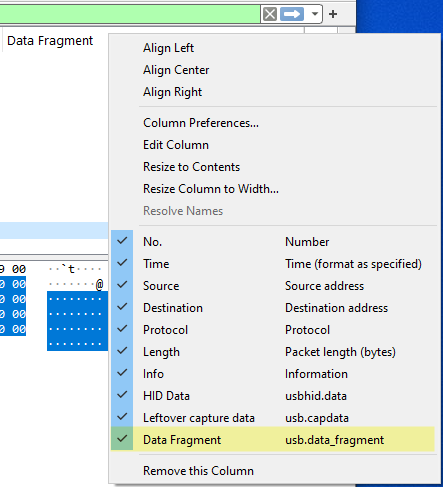
You can also apply any of the fields as a column so you can more easily skim through each packet and possibly identify expected values by eye.
Open Wireshark column preferences: Edit -> Preferences -> Appearance -> Columns -> (+) Add a new column (click the plus button as many times as you need new columns)
Then double click the “New column” field to rename the new column and then double click the empty “Fields” field to select which field the column displays. Enter one of the above mentioned filter/field names (e.g. usb.capdata) and click Apply.
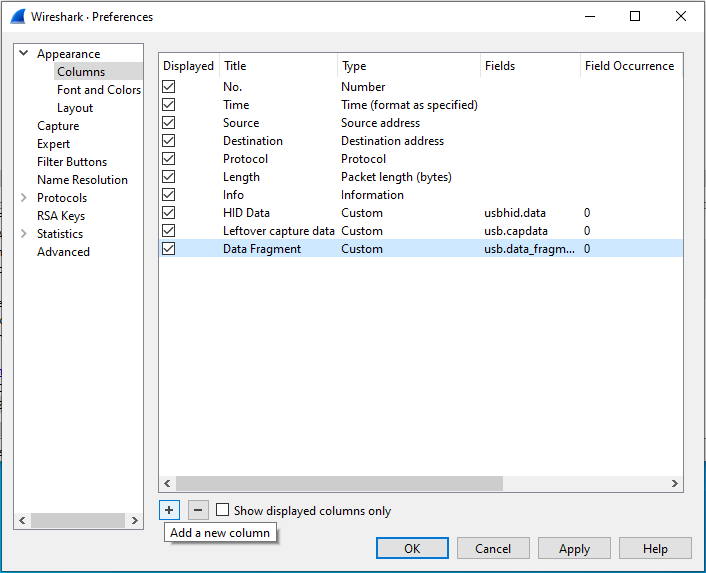
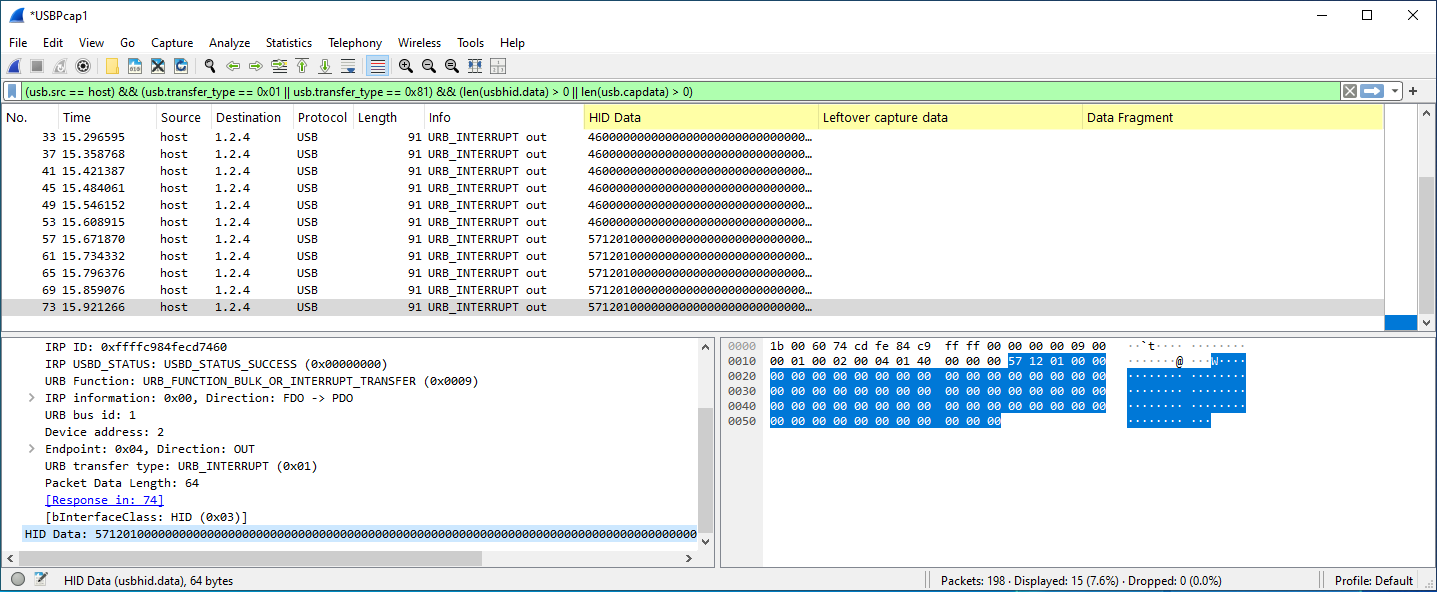
TIP: You can change the appearance of each field or even (temporarily) hide unneeded columns quickly by right clicking a field on the header line. You can re-check fields to show them again without having to go to the preferences.
Visual comparison of multiple packets and captures
When you’ve identified interesting packets possibly containing settings data, copy the “Data Fragment”, “Leftover capture data” or “HID data” values as Hex dumps and paste them into a spreadsheet or some application where you can easily compare each hex dump side by side.
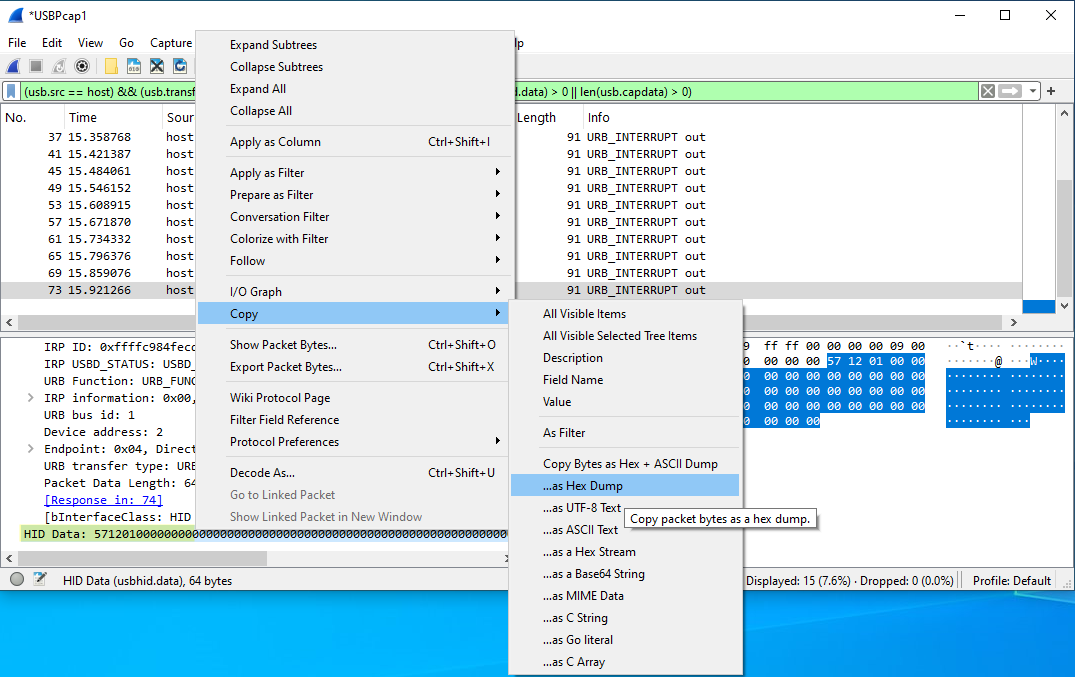
The clipboard should now contain a piece of text similar to this (the amount of lines and bytes vary):
0000   00 00 00 00 00 00 00 00 00 00 00 00 00 00 00 00
0010   00 00 00 00 00 00 00 00 00 00 00 00 00 00 00 00
0020   00 00 00 00 00 00 00 00 00 00 00 00 00 00 00 00
0030   00 00 00 00 00 00 00 00 00 00 00 00 00 00 00 00
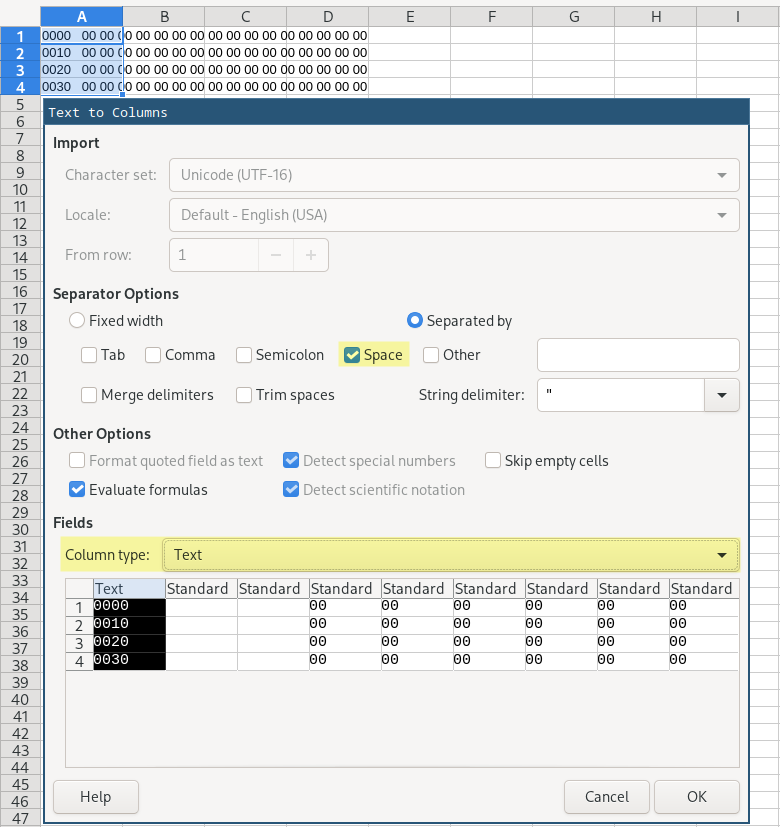
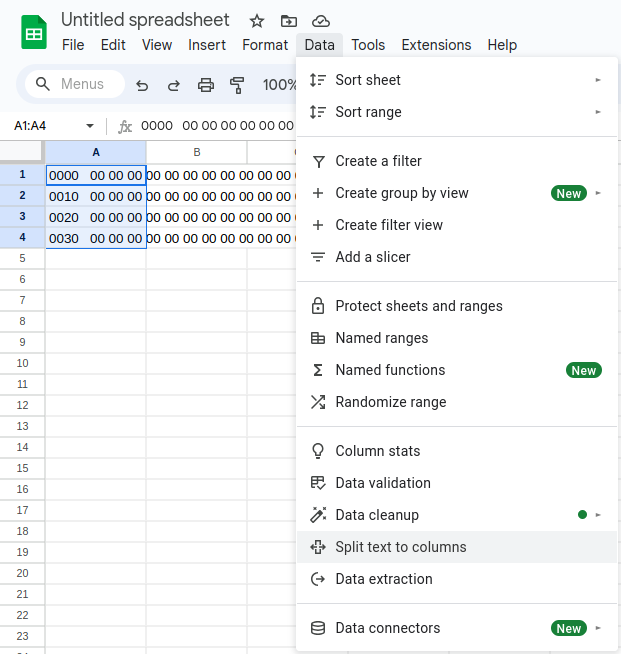
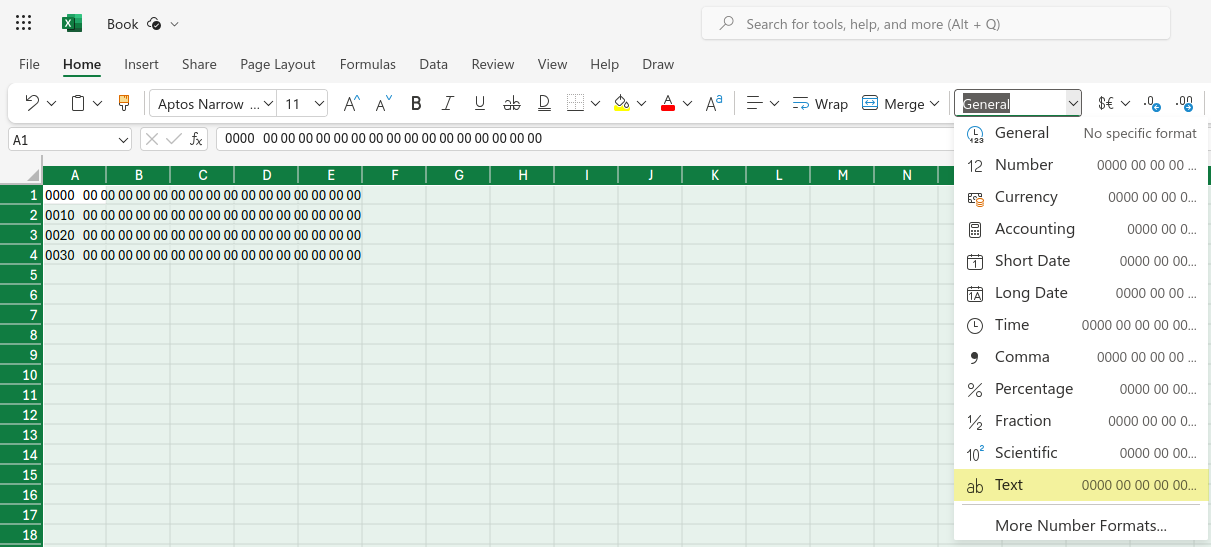
Paste the text into a spreadsheet application like Libreoffice Calc, Google Sheets or Microsoft Excel, format all cells of the sheet to be “Plain text” (so 00’s don’t become just 0’s) and use the “Data - split text to columns” feature to format each byte into a separate cell.
NOTE: Use CTRL+SHIFT+V to paste as plain text or without formatting!
Additional information for control and interrupt transfers
IMPORTANT: Also write down the bmRequestType, bRequest, wIndex and wValue values if the packet’s transfer type is URB_CONTROL! You will need those later!
You will also need to know the interface number regardless of the transfer type. The interface number is same as wIndex for URB_CONTROL packets.
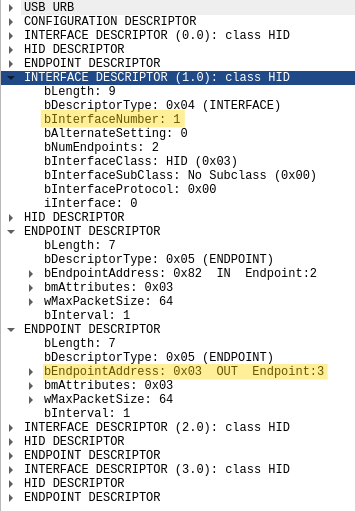
For URB_INTERRUPT packets, you will need to check the endpoint number from the control packet(s) and then check the device’s report descriptor to find out which interface the endpoint belongs to.
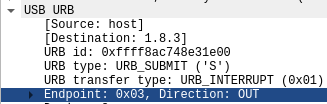
You can inspect the Wireshark capture to find the “GET DESCRIPTOR Response CONFIGURATION” packet and check each “Interface Descriptor” and find which one contains the endpoint number.
NOTE: The report descriptors will only be visible in the capture when reconnecting the device (physically or into the VM) while the capture is running. If you don’t see the report descriptors, try reconnecting the device while the capture is running.
Alternatively, you can use the lsusb command on Linux to find the interface number and endpoint number of your device. Replace 0951:16e2 with your device’s VID:PID.
lsusb -v -d 0951:16e2 | grep -E 'Interface Descriptor|bEndpointAddress|bInterfaceNumber'
    Interface Descriptor:
      bInterfaceNumber        0
        bEndpointAddress     0x81  EP 1 IN
    Interface Descriptor:
      bInterfaceNumber        1             <-- This is the interface number
        bEndpointAddress     0x82  EP 2 IN
        bEndpointAddress     0x03  EP 3 OUT <-- This is the matching endpoint number
    Interface Descriptor:
      bInterfaceNumber        2
        bEndpointAddress     0x84  EP 4 IN
    Interface Descriptor:
      bInterfaceNumber        3
        bEndpointAddress     0x85  EP 5 IN
Step-by-step instructions for common spreadsheet applications
Press Ctrl+A to select all columns and rows and then format all cells as plain text. Then split the hex dump bytes into columns by spaces. The end result should look like this. Press Ctrl+A to select all columns and rows and then format all cells as plain text. Then split the hex dump bytes into columns by spaces. The end result should look like this.See step-by-step instructions with LibreOffice Calc
See step-by-step instructions with Google Sheets


See step-by-step instructions with Microsoft Excel Online


Compare each capture and hex dump
Then start comparing each Hex dump byte-by-byte. Look for similar packets between two captures and highlight their differences.
You can also try to match two Hex dump from two captures assuming that the order of packets is the same between multiple captures. Not all software send packets in a predictable order!
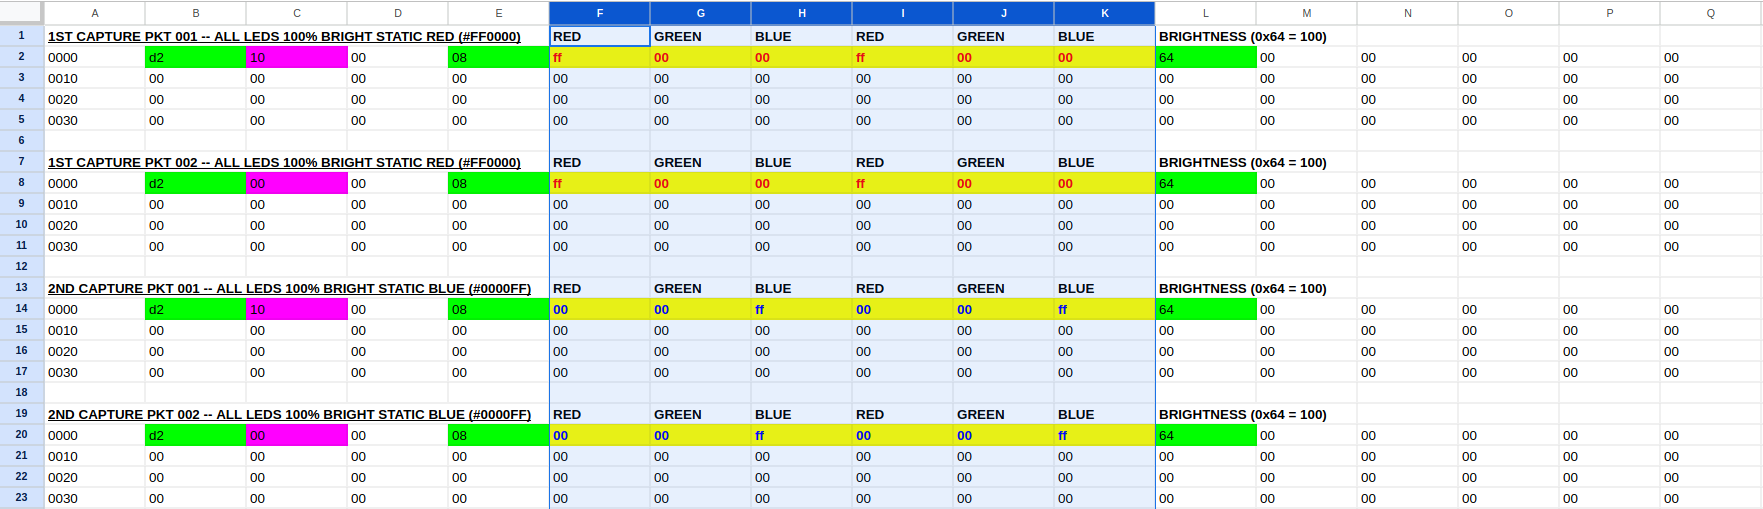
It also helps to start highlighting each different first changing byte with a different color in the beginning. So first changing byte “0x0a” is green, “0x1c” is blue and so on..
Here are some real-world examples for you to take example from.
A USB gaming mouse with two RGB LEDs. Only the LED color was changed between the two captures and RGB values were easily recognizable from the data. We can also guess that the last byte is the brightness value as 0x64 hex is 100 in decimal.
A USB soundcard with two inputs has a 3-step (off/75Hz/150Hz) switch for toggling the high-pass filter setting per input. The switch was toggled to 75Hz, then 150Hz and off in one capture. This is a good example where you don’t necessarily have to restart capture after a single action.

Need help?
Got a tricky device with difficult to understand protocol? Send me some packet captures and I’ll see if I can help you. Maybe I could even improve this guide from new knowledge.
You can find my contact details on the About page on my website.
Sending our own packets to the device
You think it’s time to start talking to the device on your own without the manufacturer’s official software? That’s where libusb comes into play!
I recommend using a Python boilerplate script below for your initial testing. You’ll need to adjust the script to match your device’s details and specific protocol.
DISCLAIMER: There is a chance that sending incorrect or malformed packets to the device could brick (as in permanently damage) the device.
Be very careful with the payload / data fragment values and don’t experiment with any device that you cannot afford breaking.
Continue at your own risk!
Requirements (Windows/Linux/MacOS):
- Basic understanding of Python scripting and syntax
- Python 3 (version 3.8 or newer)
- libusb
- PyUSB
Boilerplate scripts for sending settings:
- pyusb_control_transfer_example.py - Example script for sending settings to a device using Control transfers (URB_CONTROL)
- pyusb_interrupt_transfer_example.py - Example script for sending settings to a device using Interrupt transfers (URB_INTERRUPT)
Change all details where “FIXME” is mentioned and replace the payloads with the actual packets you previously captured.
The hex dump / spreadsheet bytes need to be formatted as 0x prefixed hexbytes for Python.
E.g. 0a 00 01 02 03 -> [0x0a, 0x00, 0x01, 0x02, 0x03]
NOTE: Running the scripts require administrator/root access!
Reading settings and/or responses from the device
There are many ways devices respond to the host or periodically send status updates to the host.
Common ways to read from USB device are:
- Sending an Interrupt transfer and immediately receiving an interrupt transfer back
- Sending a SET_REPORT request and reading a received GET_REPORT response
- Sending a GET_REPORT request and reading a received Interrupt transfer immediately after
- Randomly or periodically receiving an interrupt transfer from the device (a heartbeat or status update)
Usually the responses as are long as the requests (e.g. send 64 bytes, receive 64 bytes) or the response length is defined within the first bytes of the response packet.
Many devices repeat back exactly what was send on success.
Some devices may repeat back what was sent but replace a specific byte with something else (to perhaps indicate success or failure).
This is quite advanced and won’t be covered in this guide (contributions are welcome!). If you want to learn more about reading responses from a USB HID device, I recommend reading the sources below.
Sources and credits
- OpenRGB project - OpenRGB Wiki / Developer Documentation
- OpenRazer project - Reverse Engineering USB Protocol
- SignalRGB project - Isolating RGB Data in USB Captures
- usbmadesimple.co.uk - A Series of Articles on USB
- Michał Słomkowski - Eavesdropping on USB communication for reverse-engineering using Wireshark and VirtualBox and writing a user-space driver in Python
- PyUSB project - PyUSB tutorial
- Wikipedia and USB-IF sources mentioned in the beginning
License

The contents of this guide are licensed with Creative Commons — CC0 1.0 Universal license unless explicitly stated otherwise. Zero rights reserved.